Basketball Shooting Drills – The Basics
 |
 |
 |
Shooting Basics – General Info:
Of all the skills to learn in the game of youth basketball, basketball shooting drills are the most difficult and takes the longest time to develop.
Check out our New Download – Shooting Basics for Youth Basketball
Have you heard the saying “Shooters are made, not born?” This is what that statement means – great shooters take hundreds of shots per day in the off season. Unfortunately there is no other way to become a great shooter! Shooting the basketball is a basketball skill that can only be developed through hard work and repetition. With the proper determination and routine, you can become a proficient shooter. Youth Basketball Shooting Drills – Basics will help you get there.
Basic Shooting Form:
One of the most difficult Basketball Shooting Drills to teach is proper shooting form.
The younger players usually do not have enough strength to use proper form so right from the start “bad habits” can occur.
Steps for proper shooting form:
1. Player should be properly balanced, with feet shoulder width apart.
2. Keep the knees bent (use your legs to shoot).
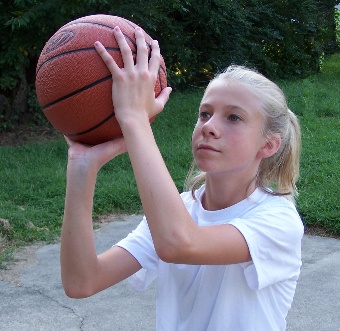
3. Keep shooting hand under the ball with elbow locked (elbow should be in – never outward, away from the body), opposite hand should be to the side of the ball helping to “balance” the ball, never helping to “shoot” the ball.
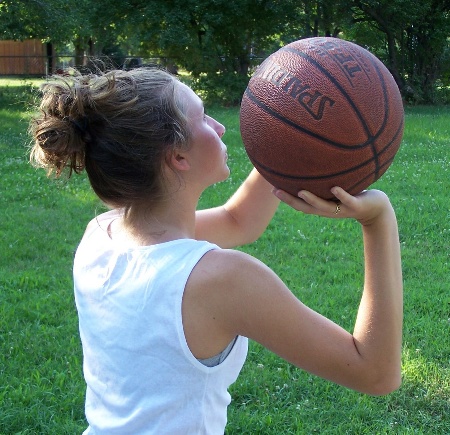
Shooting Hand under ball
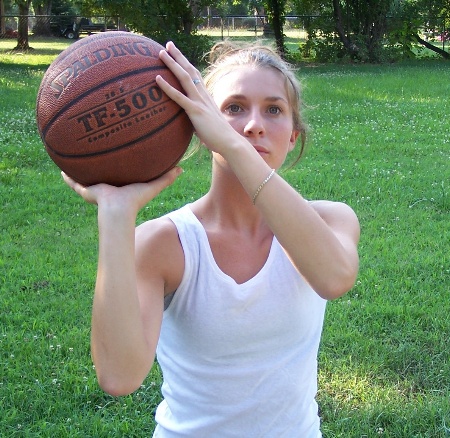
Opposite Hand balances the Ball
4. Find the target (front or back of the rim – differs from coach to coach), and focus on a “consistent” target (the rim) every time. I prefer teaching players to use the front of the rim as a target.
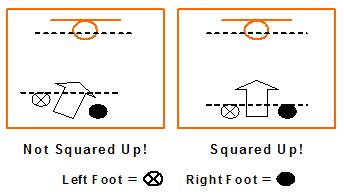
5. Square Up to the basket – Which means your shoulders are “square” (parallel) to the basket (toes pointing straight at the basket).
6. Shoot with lots of “arc” on the ball (60 degrees is the preferred arc), try to get lots of “rotation” on the ball.
7. And most importantly – Follow through: Keep the shooting hand up and fully extended, keep your fingers pointed at the rim, and keep your arm up until the ball goes in the basket, (or misses).
Shooting Form Notes: “BEEF”
Use the phrase “BEEF” = Balance (bend your knees slightly), Elbow in, Eyes on target (front or back of rim, stay consistent), and Follow through!
Stay focused on the target until the ball goes in or misses!
Let the shooting hand do all the work! The opposite hand is only used to help “balance” the ball on the shooting hand only. Do not allow the players to use two hands to shoot the basketball – This is the #1 Bad Shooting Habit).
The Follow Through:
Every time you shoot the ball you must follow through!
This goes for whether or not you make the shot or miss the shot – follow through every time you take a shot. Teach players that when they follow through it’s like they are reaching up high into a cookie jar or better yet, like they are sticking their shooting hand over the rim (into the basket).
The follow through needs to be exaggerated – Always keep your wrists relaxed, your eyes on the target, your fingers pointing straight at the target (the center of the rim), and hold your shooting arm up and fully extended until the ball either goes in or misses – are the actions of a good shooter (and very good shooting mechanics).
Squaring Up:
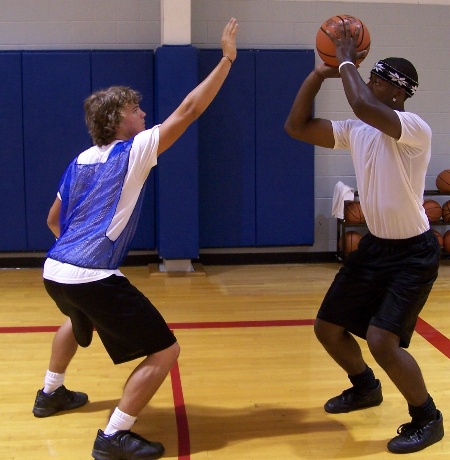
One of the most important aspects of shooting the basketball properly is squaring up to the basket. A player is “squared up” when they are facing the basket, and their shoulders parallel to the basket. Players shooting off balance or standing sideways are not “squared up” to the basket. Anytime a player shoots the ball, they should be squared up to the basket. Proper shooting form includes “squaring up” to the basket.
Types of Shots:
There are several different types of shots in basketball:
The jump shot, the lay-up, the 3-point shot, and the free throw. The jump shot and lay up equals 2 points each, the 3-point shot is obviously 3 points, and the free throw is 1 point. The 3-point shot is sometimes not used in recreational leagues, but is used in the younger AAU age groups.
The 4-Point Play – It doesn’t happen often, but when a player takes a 3-point shot, makes it, and gets fouled – it could translate into a 4-point play. I saw this happen one time while watching an NBA playoff game, it was pretty exciting and unexpected.
The Bank Shot – A bank shot is when a shooter uses the backboard to assist with making the shot. Mostly used by post players down low, and closer to the basket (you wouldn’t use the backboard to bank in a 3-point shot). Coaches usually teach players to use the backboard anytime you are under or close to the basket. A lay up can be considered a type of bank shot since you use the backboard to assist with the shot.
The Jump Shot:
The term “jump shot” has a couple meanings when using it with “youth” basketball.
Basically a “jump shot” is when a player takes a shot from the “outside” area of the paint (away from the basket). The more experienced meaning would be when a player catches the ball, sets up for a shot from the outside, and jumps straight up while shooting (gets some height while shooting – doesn’t shoot flat footed). The jump shot is a very hard basketball shooting drills to master.
Note: It is important for the younger players to understand that they should not shoot “flat footed” and that they will need to get “off the floor” a little when they shoot (use their legs when shooting).
The Lay-Up:
The Lay-Up is sometimes referred to as the “easiest shot” in basketball, and simply stated, it is the easiest shot!
So if the Lay-Up is the “easiest” shot in basketball – why are there so many missed lay-ups in games? The lay-up is a shooting skill that is ignored often. The Lay-Up is an easy shot to shoot, but most players do not take the time to “practice” the lay-up. A good attitude to have is that you are going to make every lay-up you take. Only hard work will help with this goal. This along with the proper basketball shooting drills will help a player develop skills faster.
a) The target is the closest top corner of the “square.”
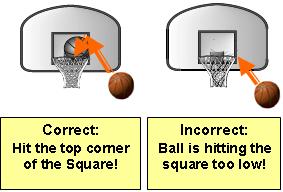
b) Keep the ball to the outside, away from the defense (protect the ball).
c) Right side lay-up: Starts with right foot, then left foot and up (two steps and up). Left side lay-up: Starts with left foot, then right foot and up (two steps and up).
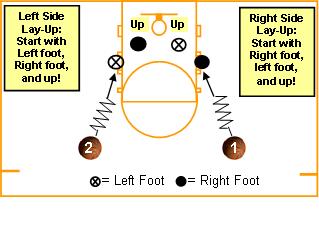 d) Your hand should be behind / under the ball, shoot softly (lay it in) – shooting too hard will cause the ball to bounce off the backboard with more force.
e) The jump (the last part of the lay up) should be a “high” jump not a “long” jump (player should be able to rebound the shot after they land).
Executing a Lay-Up
The Lay-up is basically “2-steps and up.”
After you take the 2 steps – the “up” part should be more of a high jump than a long jump (jump up to the basket, not past the basket). Keep the ball away from the defender, take the proper angle to the basket, and focus on “finishing” the shot (there’s nothing more embarrassing to a player than missing a wide open lay up).
Developing the Right Hand Lay Up - The Steps
Error! You must specify an anchor parameter if you are not using the auto_thumb option.
How many ways are there to do a lay-up?
Here are “four” different versions of the lay-up (there are most likely more versions, but lets take a look at these four).
Regular (standard) Lay-Up – Using two steps and up, with your hand under the ball (as described above). This Lay-Up is used when a player drives to the basket, short distances, etc.
Palm Up Lay-Up – This form of Lay-Up is used when a player needs to “soften up” the shot, for example during a fast break, long distances, etc.
Power Lay-Up – Used by post players. This Lay-Up is used by a post player close to the basket and entails going up with both hands on the ball when shooting the lay up. Works great in a crowd because having both hands on the ball gives defenders more to swat at (a defender that is trying to block your shot will most likely hit one of your hands, which is a foul, and you will be shooting free throws).
Reverse Lay-Up – This Lay-Up is used when a player drives to the basket from one direction and finishes the lay up on the opposite side they are driving from. Example: A player is on the right side and drives, they cannot finish the lay up on the right (could be a defender in the way) so they continue and shoot the lay up on the left side of the basket.
Reverse Lay-Up / Basic Examples
Free Throws: “The Shot for All Players”
The “Free Throw” is the shot that any player, large or small, tall or short can learn to shoot!
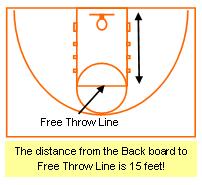 Steps for proper free throw shooting form:
a) Find the target (front or back of the rim – I prefer the front of the rim), and focus on a “consistent” target (the rim) every time.
b) Perform your “free throw” routine (take a couple of dribbles, pause / focus, then shoot).
c) Always take a deep breath after the ref passes you the ball.
d) Balance: Keep your weight forward (don’t fall back).
e) Shoot with lots of “arc” on the ball (60 degrees is the preferred arc).
f) Follow through – Keep the shooting hand up, and “point” at the center of the rim. Keep shooting hand up until the ball goes in the basket or misses.
g) Players should not watch the ball as it is in flight, but rather stay focused on the target (the rim) until the ball goes in (or misses).h) A player has 10 seconds from the time the ref passes them the ball, to actually shoot the ball.
Grooving your shot – Free Throws!
Free Throw Shooting is an art form that can only be developed through hard work and repetition (called mind – memorization). Keep in mind, as with all shooting, that it will take thousands of practice shots to become a proficient free throw shooter. It doesn’t matter what size you are (short, tall, big or small) the Free Throw can be every players shot. There is no excuse to miss many free throws. To be a really good all around player, you need to shoot around 70-80% consistently.
Grooving your shot is one of the best ways to develop good free throw basketball shooting skills. Check it out…
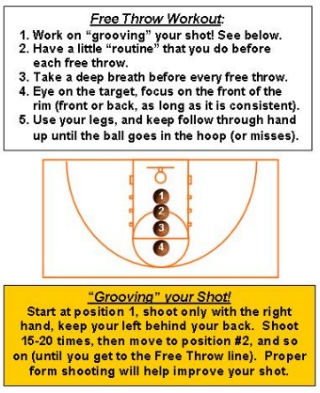
Grooving the Free Throw Shot Drill
Don’t neglect shooting free throws in practice
Free Throws account for 15-20% of the total points in an average basketball game.
Games can be won or lost at the free throw line. Coaches must make time for players to shoot free throws in practice. If not, don’t complain that your team was only 8 for 20 from the free throw line. Make shooting free throws part of your basketball shooting drills practice plan. Free throws are taken in the game after players have run up and down the court (and are a little tired). So it makes sense to have your players practice free throws after they run (or are a little tired). Example: Shoot free throws after line conditioning drills (see video clip), conditioning type drills, or full court drills, and now the players get to shoot free throws in a “game like” situation.
Shooting is an Art Form
Shooting is an art form that takes years of hard work, lots of basketball shooting drills, and dedication to master. In order to become a great shooter, you must shoot thousands of shots over a long period of time. Mind-memorization is what occurs while a player practices shooting (so the longer you practice, the more the mind can memorize). It is very common for shooters to take 200 jump shots, 50 free throws, 50 three pointers, and 50 lay ups during their shooting routine (some shoot more than that). Be aware that taking this many shots every day can add stress to your arms / elbows – know when to say when!
Shooting Routing Log / Tracking Form – Handout
As a coach or parent will you expect your 10 year old son or daughter to go outside and shoot this many times? The answer is no. You want younger players to develop correct shooting form. Most of all learn the proper youth basketball shooting basics. The younger players can easily develop bad shooting habits. Bad habits that can stick with them all through high school if coaches do not help them fix it. Don’t forget to check out our new download “Shooting Basics for Youth Basketball”
Basketball Shooting Drills
Here are all the Shooting Drills Handouts all in one place
